The ability of taking screenshots is built into almost all the versions of the Windows operating system. Whether you are running older Windows XP or the latest Windows 10 on your computer, you do have the ability to capture screenshots on your computer and that too without using a third-party application.
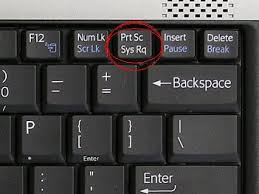
The feature that makes taking screenshots possible on Windows PCs is the PrtSc button. The button is located on your keyboard and pressing it saves the current screen as a screenshot on the computer.
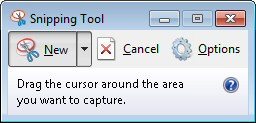
Not only that, with Windows 7, you have an additional built-in utility called Snipping tool that lets you capture specific screenshots on your computer. Here’s how you can use both the ways to take screenshots on your Windows 7 computer.
Way 1: Taking a Screenshot using PrtSc in Windows 7
In this method, you need to press a key on your keyboard and it will take a screenshot of your current screen and save it as an image in the clipboard. Since it saves the screenshot in the clipboard, you will need to find an app on your computer that can handle images so you can paste the screenshot image there.
Here’re the steps:
1. Get to the screen whose screenshot you wish to capture.
2. Press the PrtSc button on your keyboard and the screenshot will be taken and saved in your clipboard.

3. Open the MS Paint app on your computer and press Ctrl + V on your keyboard to paste the screenshot.
4. You can now save the screenshot using the Paint app.
So, that was how you could take a screenshot using the PrtSc button on your keyboard.
Another method is to use the Snipping tool to capture screenshots. What’s different about this method is that this method allows you to select the area of the screen you would like to be covered in the screenshot. Here’s how to use it:
Way 2: Taking a Screenshot using Snipping tool in Windows 7
1. Click on the Start button on your PC and search for and double-click on Snipping tool. It will open the app.
2. When the Snipping tool opens, click on New and it will let you take a new screenshot.

3. Choose the area and take your screenshot.
So, that was how you could use the Snipping tool to capture a screenshot in Windows 7.
Sometimes, while taking screenshots in Windows 7, what happens is that your OS crashes. There could be multiple reasons as to why that happens but if it’s happening with you then it is sure to annoy you and you will not be able to take a screenshot on your PC. If that’s the case, you can use a nice app called Windows Boot Genius that helps you fix Windows crashes. Here’s how to do that: