Step 1: Check the network driver status
First of all, you need to access Windows 10 Device Manager to check if the driver functions well.
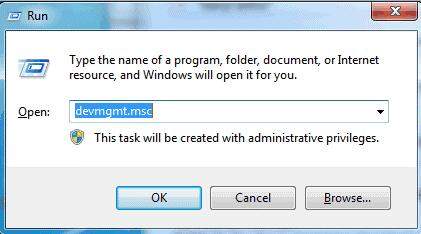
- Press Windows key and R key (Win+R) simultaneously.
- A Run dialog will pop up, then type devmgmt.smc in the blank space and click OK to open Device Manager.
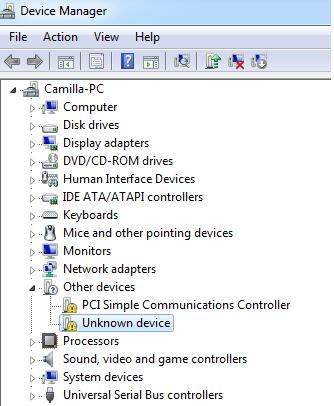
- Check if there’s a yellow mark in the bottom right corner of the devices.


Yellow mark means the network adapter driver has problems, you must fix it as soon as possible since problem drivers would slow your PC performance.
Step 2: Search if there’s an updated driver available
Then try to find a new driver for the network adapter within the Windows 10 computer.
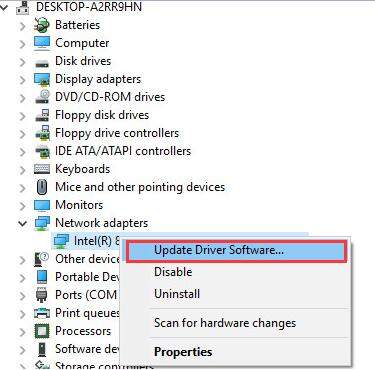
- Open Device Manager and click the drop-down menu of Network adapters.
- Right click on the network device name to select Update Driver Software.
- Choose Search automatically for updated driver software.

After that, follow the intuitive prompts on the screen to proceed and click “Close” to end the whole updating process.
Step 3: Update network adapter driver without internet connection
Should the Windows 10 fails to find available useful driver for the network adapter, you need to visit the PC manufacturer’s or the device manufacturer’s website to install the latest network adapter driver. Considering your PC’s network doesn’t work properly, you can download the driver to a USB flash drive using another computer and copy to your PC afterwards.
Chances are that a wrong or forgettable Wi-Fi password leads to network disconnection, in that case, you can directly take advantage of Wi-Fi Password Recovery to quickly recover corresponding passwords however complicated they are, which makes downloading network adapter driver much easier.
Tips: Make sure you download the right driver in accordance with the PC model name, the device manufacturer and the specific operation system, i.e., Windows 10. Or you can search for driver update tool online, which helps to update the drivers in an extremely easy way.