Windows Boot Genius is the 22-in-1 Windows repair software. It holds several Windows repair tools that can simply fix all Windows boot problems, such as blue screen of death, black screen of death, freezing loading bar, random system corruption, etc. Moreover, it can recover data, windows password and Microsoft product key; clone, backup or restore Windows, hard disk and partitions; resize, format, create or delete partitions after Windows crash.
The following tutorial shows you how to use Windows Boot Genius step by step.
Create a Boot Disk
Step 1. Download Windows Boot Genius and install it on any workable computer.
Buy Now Windows Boot Genius:
 |
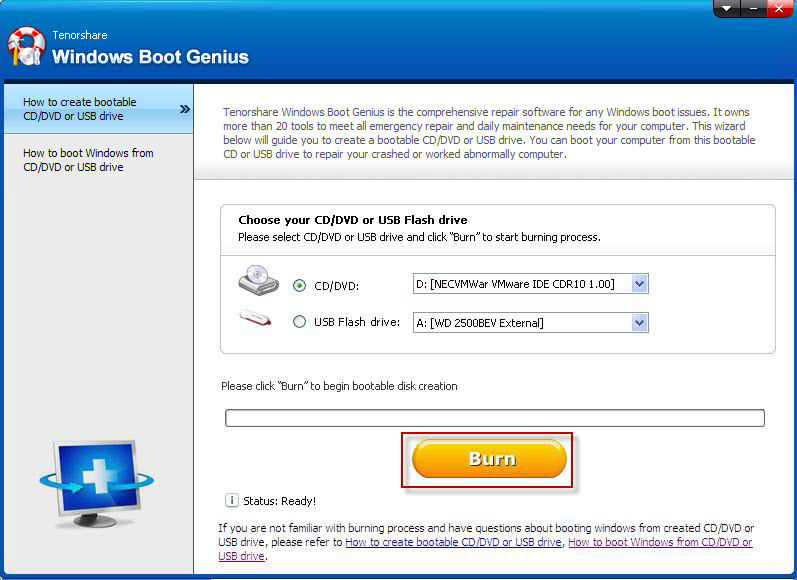
Step 2. Insert one blank CD/DVD or USB flash drive to this computer and then launch Windows Boot Genius. In the main interface, select CD/DVD or USB flash drive, and then click "Burn" to begin boot disk creation.
Boot up computer that starts improperly from the newly created boot disk. To learn how to boot up computer from CD/DVD or USB Drive, you can refer to
BIOS Setting for CD/DVD
BIOS Setting for USB Drive
Windows Rescue
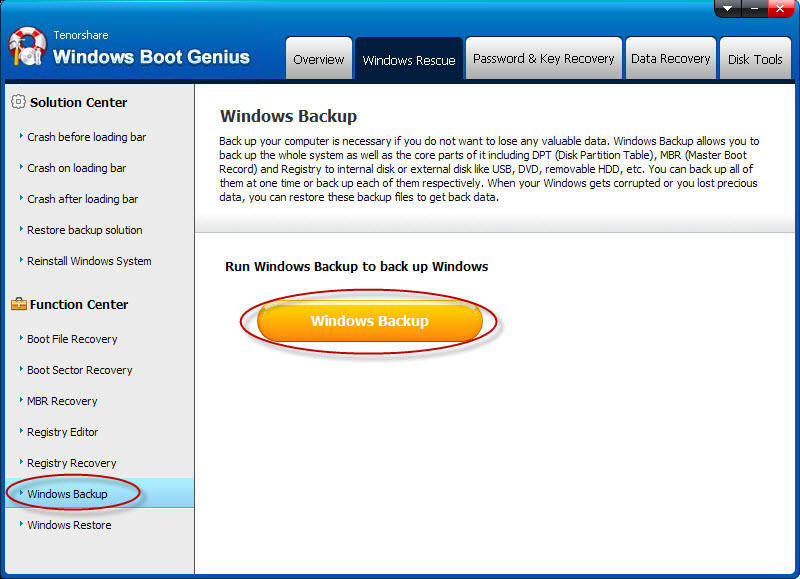
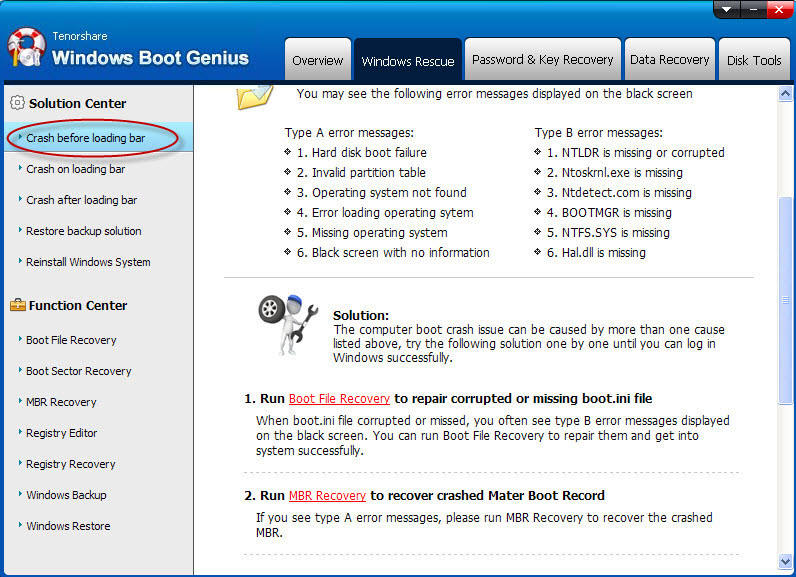
Then you will see the interface of Windows Boot Genius displayed like below. In the left window, there are two parts: Solution Center and Function Center. In Solution Center, It states phenomena of your computer boot issues and corresponding solutions one by one. In Function Center, you will see all Windows boot repair tools. There are 7 Windows rescue tools: Boot File Recovery, Boot Sector Recovery, MBR Recovery, Registry Editor, Registry Recovery, Windows Backup and Windows Restore.
Backup Windows Operating System
Repair Computer Crashed before Loading Bar
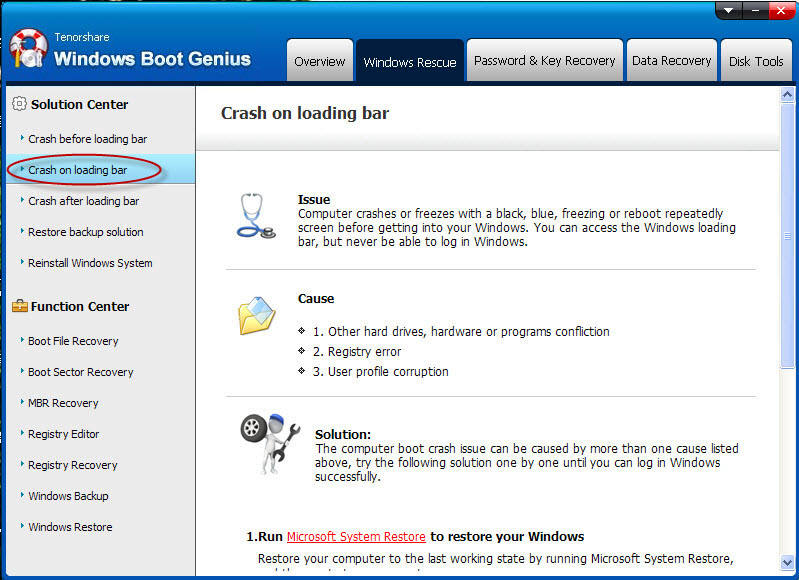
Repair Computer Crashed on Loading Bar
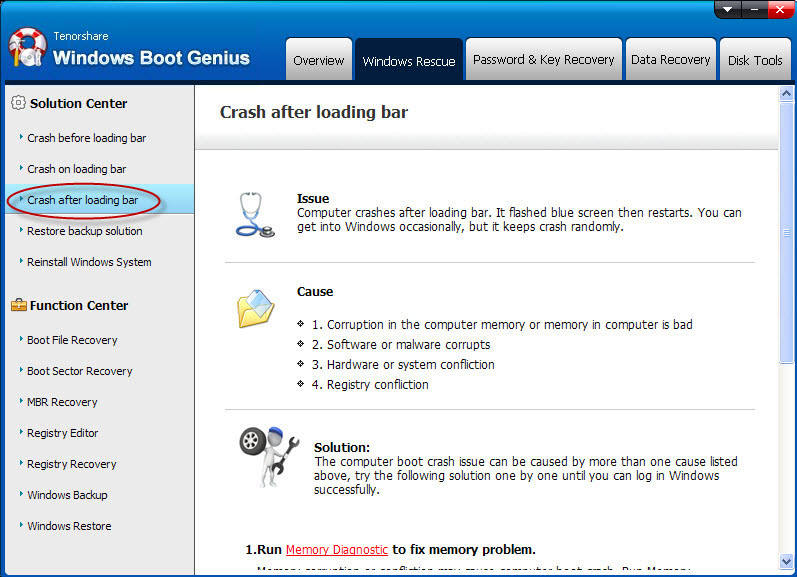
Repair Computer Crashed after Loading Bar
Before doing system repair, you are highly recommended to backup your operating system. This step is significantly important because you are failed to repair Windows, you can still get your operating system to the original state with the function of Windows Restore. Here you will know how to backup Windows system.
Backup Windows Operating System
Step 1. Choose "Windows Rescue" mode and select "Windows Backup", then click "Windows Backup" button.
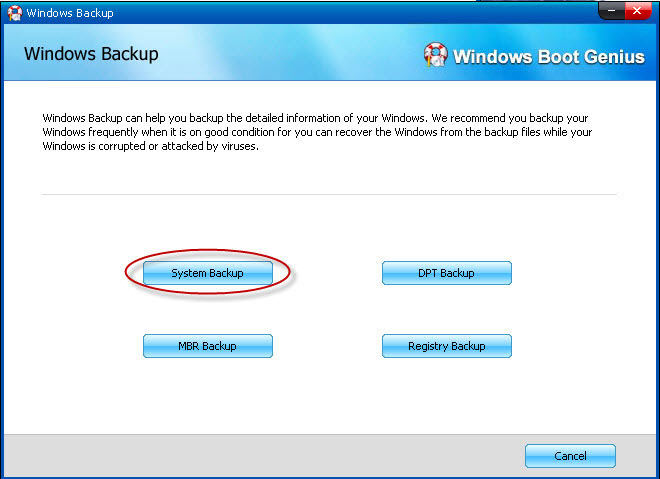
Step 2. In the pop up window, you can backup system, DPT, MBR and Registry. Choose any of them to continue (Here we take System Backup for example). You are friendly suggested to backup all of them for safety consideration.
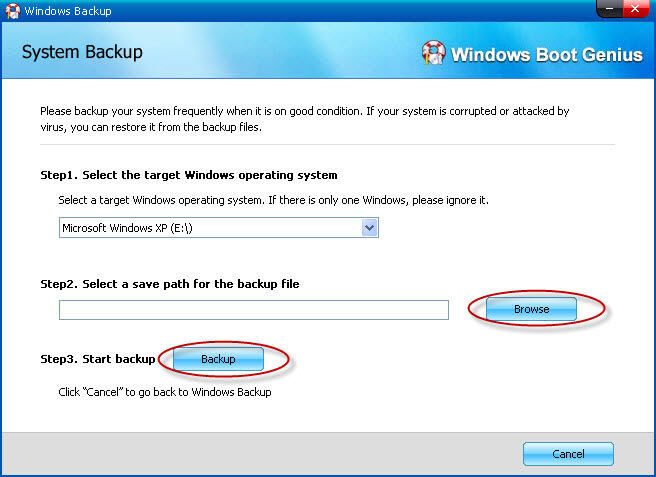
Step 3. Select the target Windows operating system and save path, then click "Backup" button to keep a backup.
Then follow the steps on how to repair blue/black screen or corrupted computers. According to your crashing symptoms, Select one solution and use the tools this software lists one by one until your computer works normally.
Repair Computer Crashed before Loading Bar
If your computer got crashed with black/blue screen of death before arriving at the loading bar, and you encounter error messages like:
- -Hard disk boot failure
- -Invalid partition table
- -Operating system not found
- -Error loading operating system
- -Missing operating system
- -Black screen with no information
- -NTLDR is missing of corrupted
- -Ntoshml.exe is missing
- -Ntdetect.com is missing
- -BOOTMGR is missing
- -NTFS.SYS is missing
- -Hal.dll is missing
Please select "Crash before loading bar" and follow the solutions instruction to repair your operating system step by step.
Repair Computer Crashed on Loading Bar
You can access to the Windows loading bar, but never be able to log in Windows. That's because the operating system has confliction with other hard drives or programs or registry got some error. In this case, you can go to "Crash on loading bar" center to fix your problems.
Repair Computer Crashed after Loading Bar
You can get access to the operating system, but it flashes black/blue screen then restart. And it keeps crash randomly. That is caused by the bad computer memory, corrupted software or malware, etc. You can go to "Crashed after loading bar" center to repair the crashed computer.
Password & Key Recovery
If you are locked out of Windows computer without password, or can't find the Microsoft product keys after reinstalling operating system, you can go to "Password & Key Recovery" to get them back.
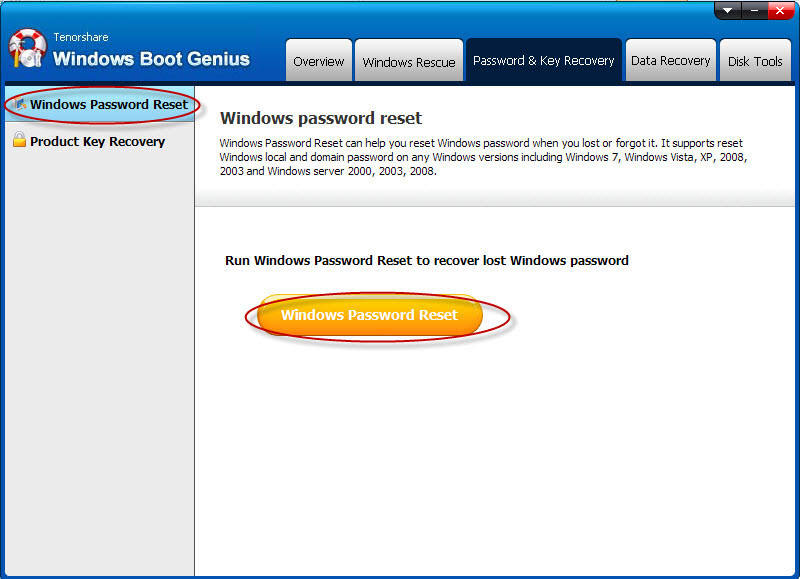
Windows Password Reset
Step 1. Select Windows Password Reset and Click "Windows Password Reset" button.
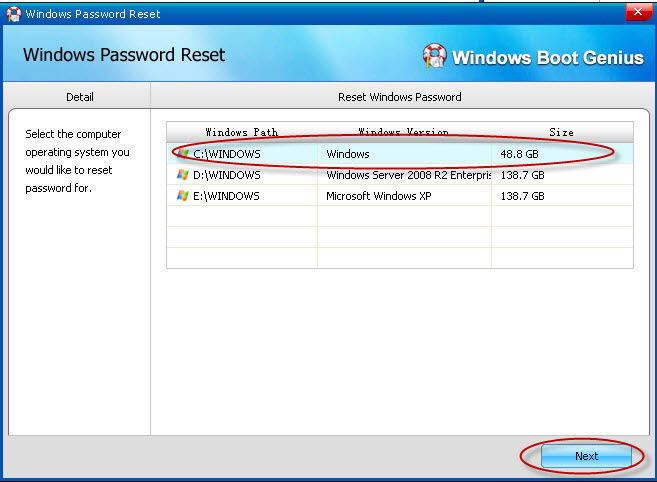
Step 2. In the pop up Windows Password Reset window, select one operating system and click "Next" to continue.
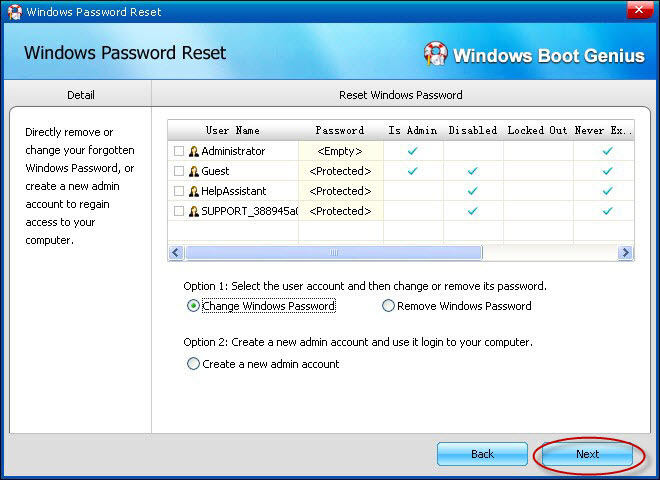
Step 3. You can change, remove Windows local and domain password as well as create a new user account here. Choose one user account first. Then check one option and click "Next" to begin password crack.
Product Key Recovery
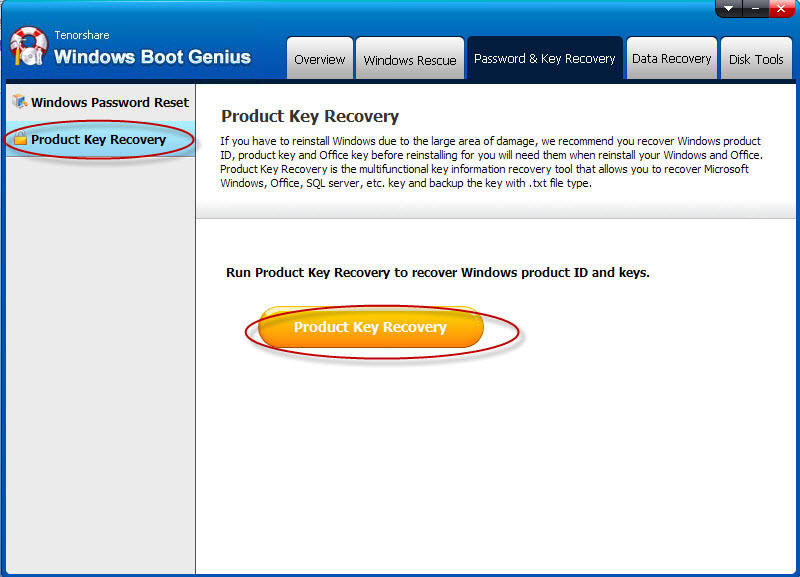
Step 1. Select Product Key Recovery and click "Product Key Recovery" button.
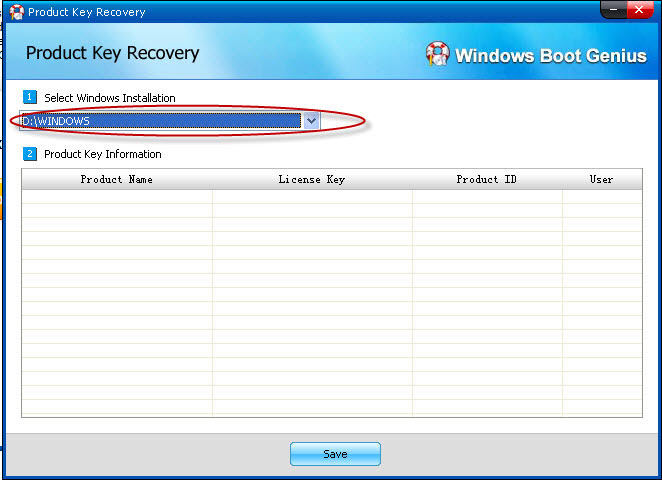
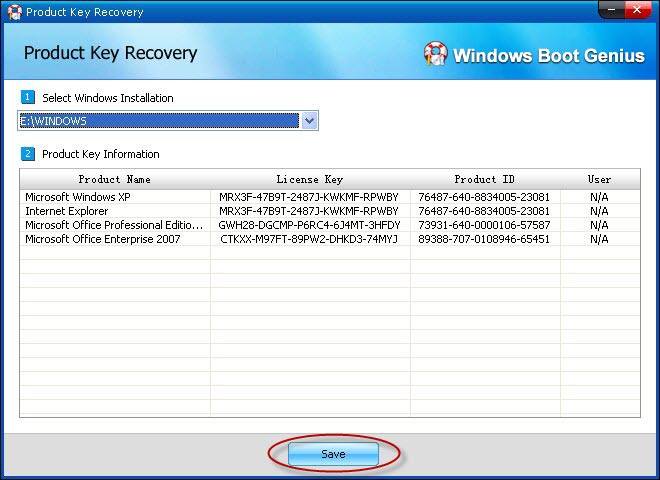
Step 2. In the pop up Product Key Recovery window, select Windows Installation, and you will see all Microsoft product listed there with product name, license key and product ID.
Step 3. Click "Save" to keep a backup of the product key for further use.
Data Recovery
Computer got corrupted completely, and there is no hope to get it to normal. Don't worry! At least, you can get all your precious data back with "Data Recovery".
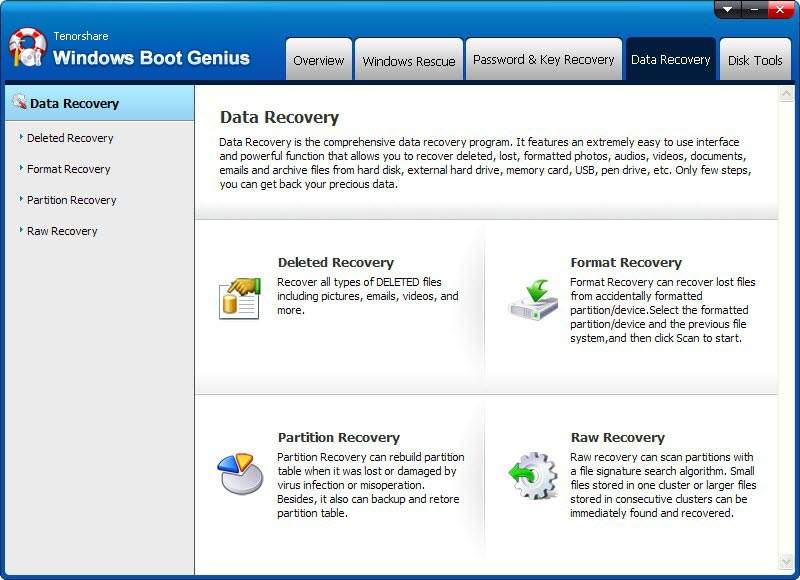
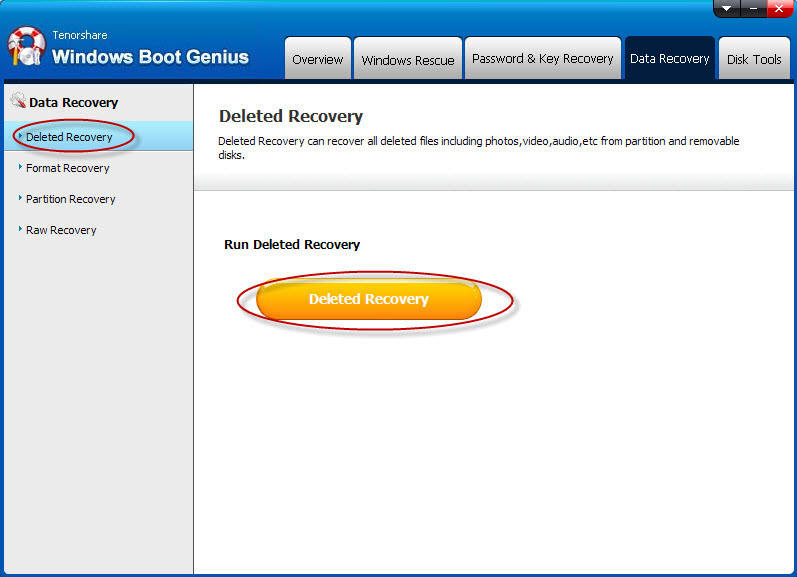
Step 1. There are 4 data recovery available: Deleted Recovery, Format Recovery, Partition Recovery and Raw Recovery. Choose one of them. Here we take "Deleted Recovery" for example. Select it and click "Deleted Recovery" button.
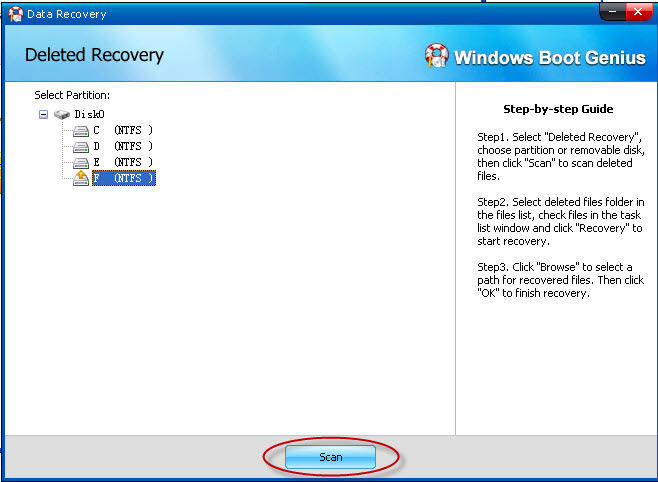
Step 2. Select one partition and click "Scan" to begin scanning.
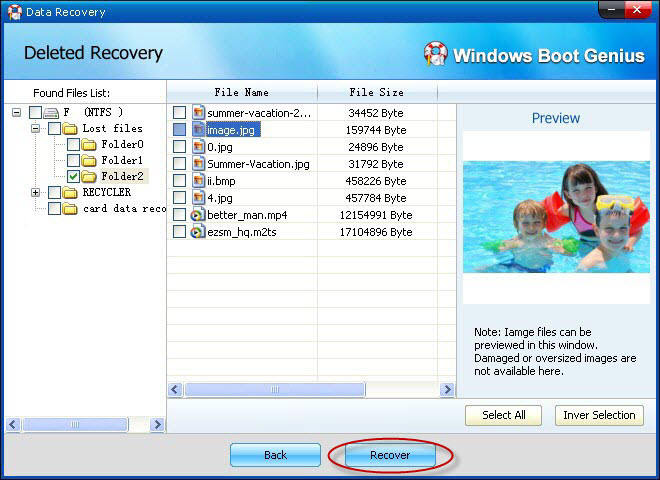
Step 3. Click folder in the left window and you will see all files in the folder displayed in the right panel. Check them and click "Recover" button. In the pop up window, click "Browse" to indentify a save path for the recovered files and click "Ok" to confirm data recovery. You'd better save them on a removable device instead of the corrupt hard drive.
Disk Tools
In this mode, you can clone the content of the whole disk or partitions and restore them in case of data loss. It also allows you to manage partitions.
Clone Entire Disk or Clone One Partition
Clone Entire Disk or Clone One Partition (Take Clone One Partition for instance)
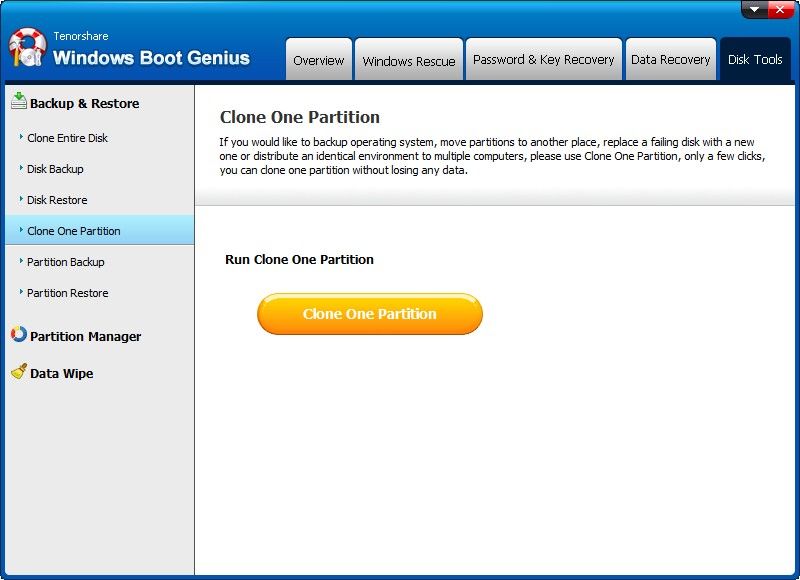
Step 1. Choose Clone One Partition and click "Clone One Partition" button.
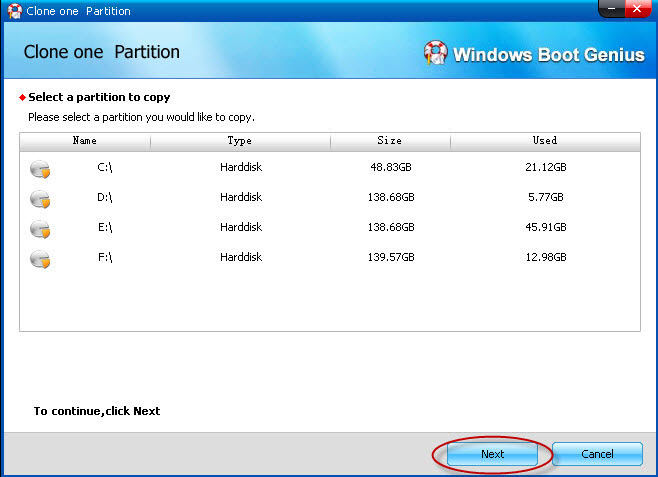
Step 2. Select one partition you would like to copy. Then click "Next" to continue.
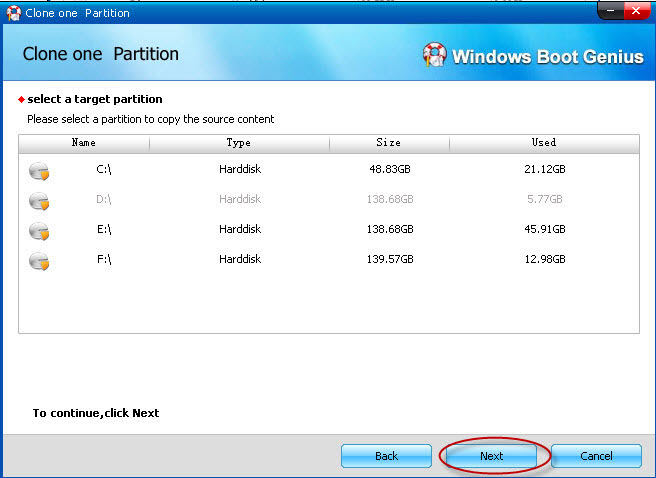
Step 3. Highlight one partition to place the copied partition and click "Next" to begin cloning.
Note: The capacity of the target disk should be larger than the previous one.
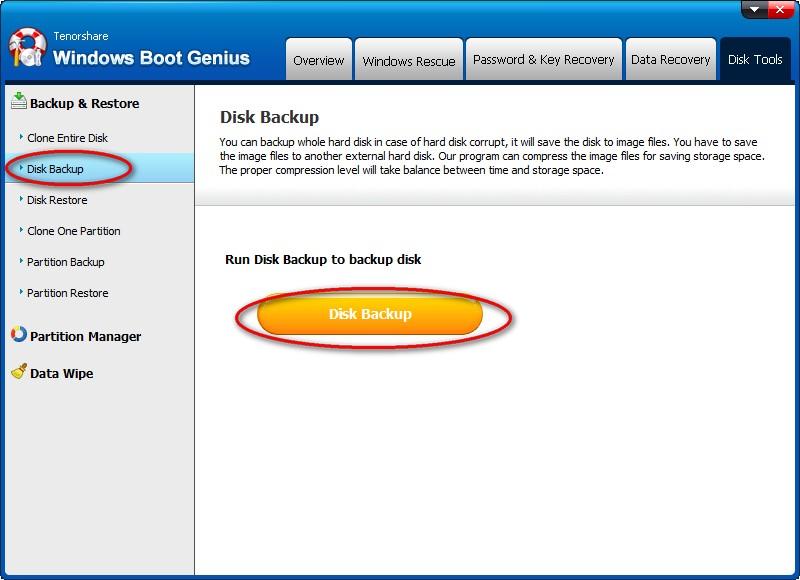
Backup Disk or Partition (Take Backup Disk for example)
Step 1. Choose Disk Backup and click "Disk Backup" button.
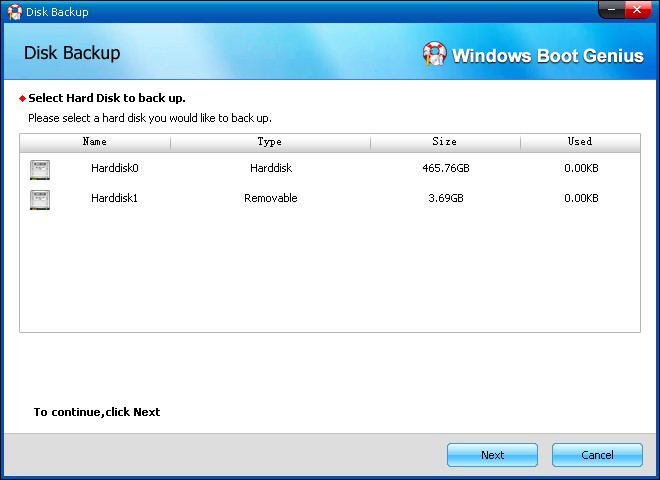
Step 2. Highlight hard disk you would like to backup and click "Next" to proceed with.
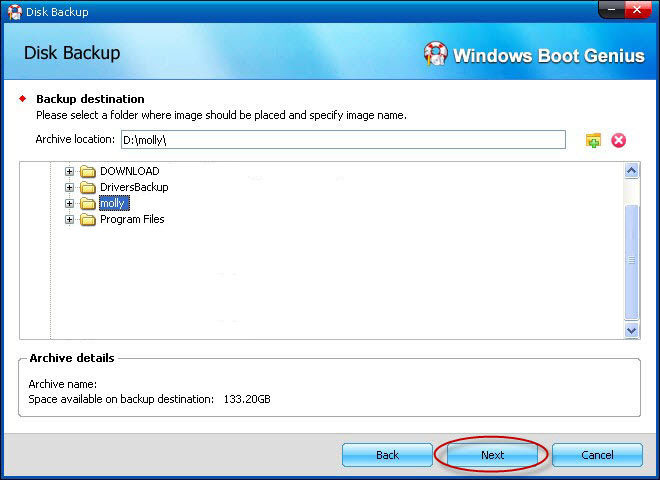
Step 3. Indentify a save path to keep the image file and click "Next" to begin compressing.
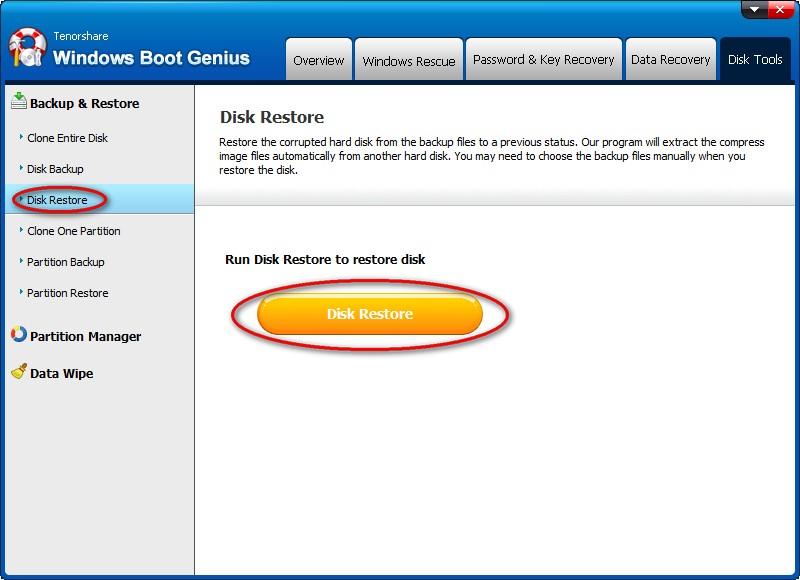
Restore Disk and Partition (Take Restore Disk for example)
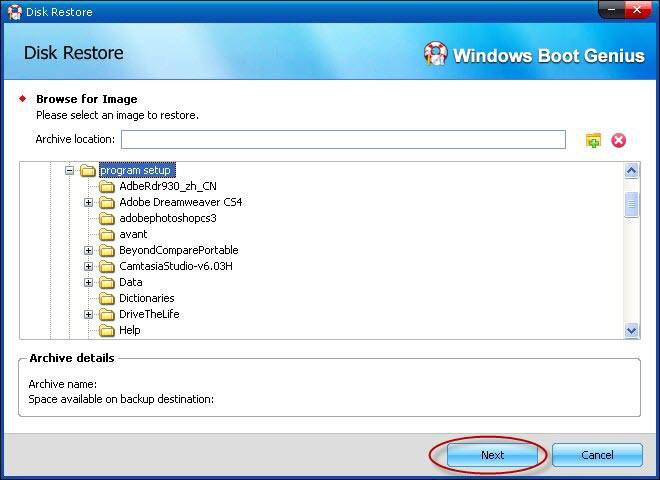
Step 1. Choose Disk Restore and click "Disk Restore" button.
Step 2. Select the .img file you have backed up before. And then click "Next" to continue.
Step 3. Disk Restore will extract the compressed .img file automatically.
Partition Manager
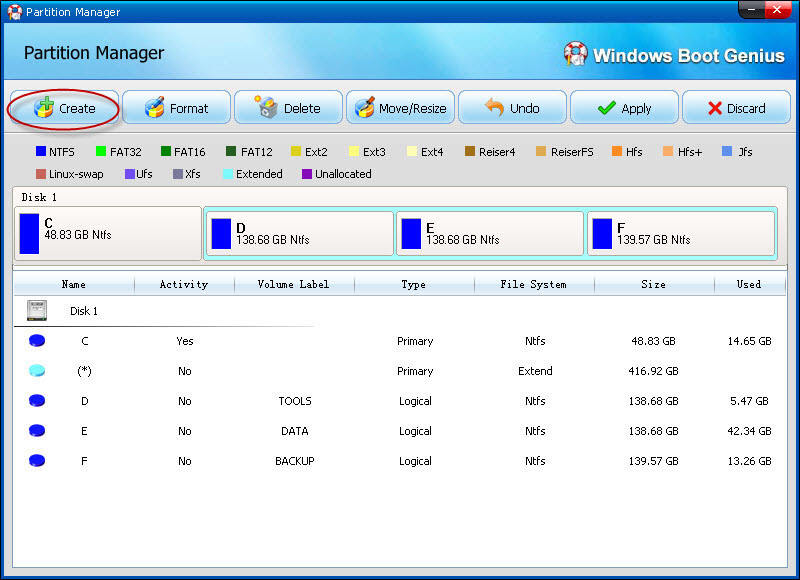
Step 1. Choose Partition Manager and click "Partition Manager" button.
Step 2. In the Partition Manager window, you can create, format, delete or resize partitions. Here we take Create new partition for instance. Click "Create" button.
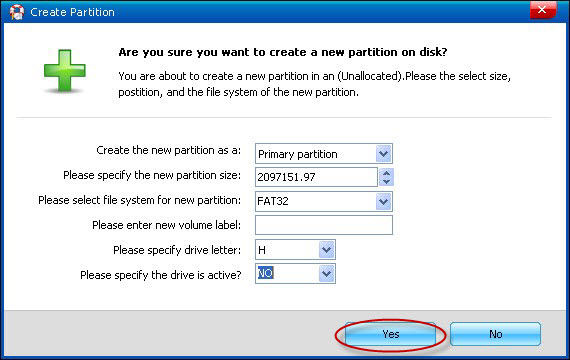
Step 3. In the pop up window, select the partition type, size and drive letter for the new partition. Then click "Yes".
Step 4: Click "Apply" to confirm the operation.
Note: There are 4 primary partitions at most on a hard disk. You should check if there are 4 primary partitions. If there are already 4 primary partitions, you can't create one more partition. You can delete one of the primary partitions and create an extended partition, and then you can create more than one logical partition in the extended partition.
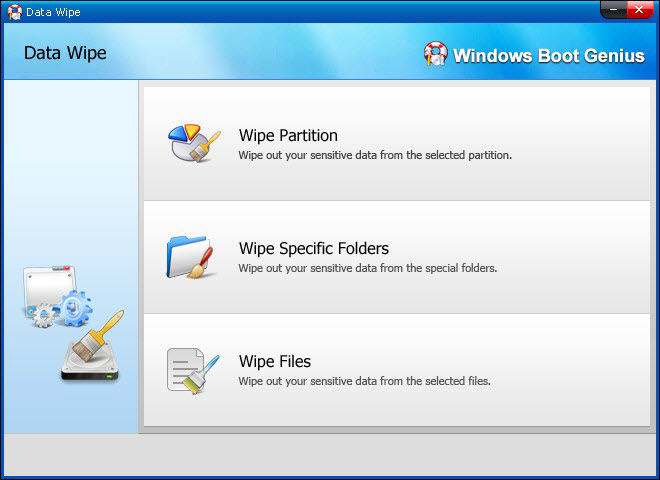
Data Wipe
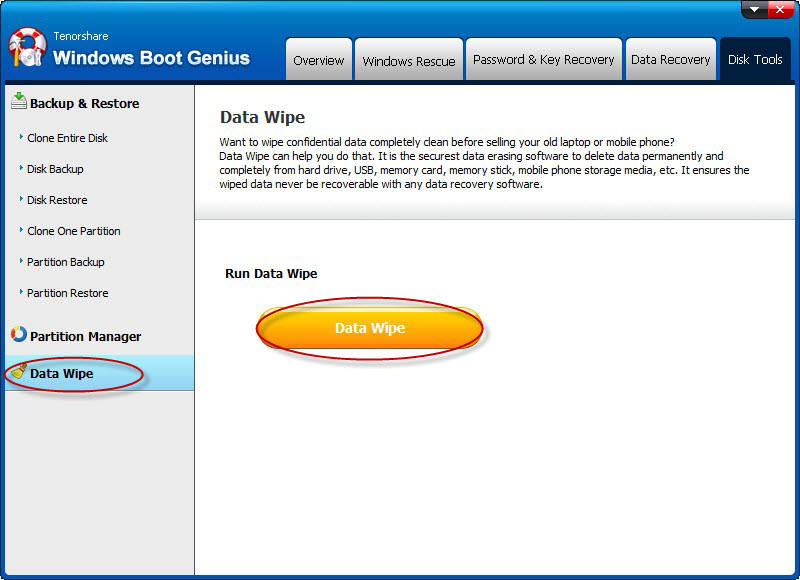
Step 1: Choose Data Wipe and click "Data Wipe" button.
Step 2: Here you have 3 options: Wipe Partition, Wipe Specific Folders and Wipe Files. Select the one you want, here we take Wipe Specific Folders for example.
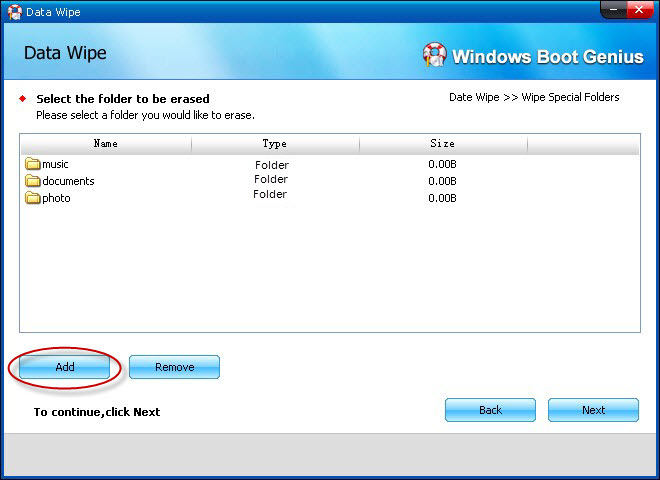
Step 3: Click "Add" to load the folders you want to delete data, you can add several folders to wipe simultaneously. You can also click "Remove" to remove the folder you imported mistakenly.
Note: The wiped data can't be recovered by any recover tool, so please confirm the list before the operation.
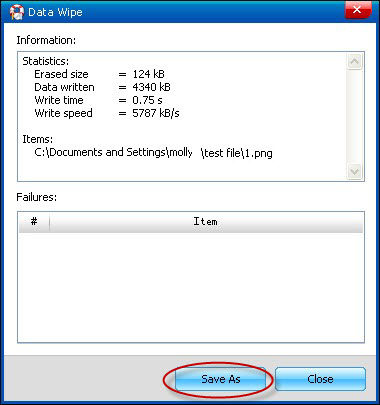
Step 4: Highlight the folder(s) you want to wipe data and click "Next" to delete all data in it. After that you can click "Save As" to save your deletion record.
Sounds Good? Get " Windows Boot Genius " Now!
If you have any questions about this program, please contact us, We provide lifelong technical support and upgrade service.
